How to Create an AI Insurance Agent Product in Openkoda PAS
Describe an AI agent as insurable attributes - pinned model version, autonomy, spending authority, guardrails - then read the cover, rules and rating built on them.
Hand a Word requirements document to the AI Product Builder, read the proposal before anything changes, then check the risk item, rating, rules and workflow it wrote.

A new product always starts the same way: somebody in product and pricing writes a document. It says what is being launched, what is insured, what is covered, what it costs, who gets turned away and what should happen when an application arrives. It is written in business language, because the people who write it think in business language.
Then it is configured, which means the same six things are said again in a system’s terms:
Nothing in that list is derived from the document. It is all already in there. The gap between a requirements document and a configured product is mostly transcription, and transcription is where products lose their first month.
This article walks through closing that gap in one pass, and then, the longer half, through checking what came out. The checking is the point. A builder that proposes configuration is only useful if a person can read what it proposes before it is real, and verify it component by component afterwards.
The whole thing is on video as well, if you would rather watch someone do it than read the steps. It covers the same fourteen steps in one pass; the written version below is the one to keep open in another window while you configure your own.
Before you start, you will need: a requirements document, an empty product to configure, and an account that can reach the Product Builder.
No special format, no field codes, no template. An ordinary document with headings and a few tables.
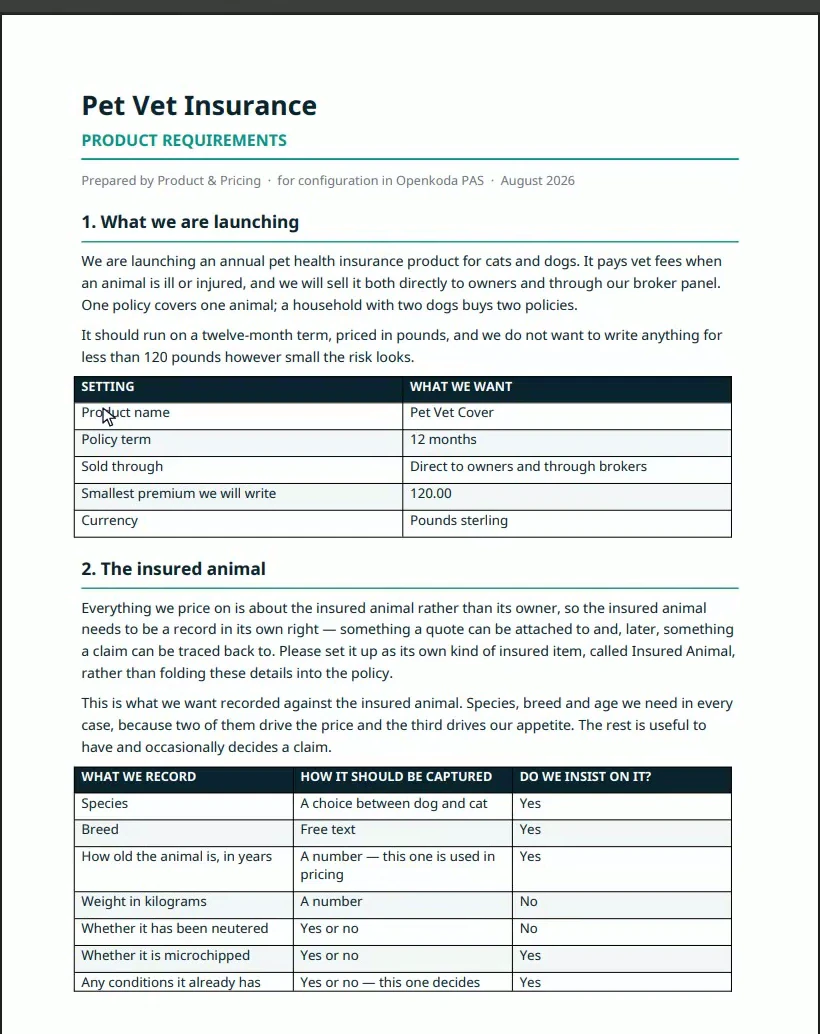
One habit is worth adopting, and it is not a technical one: put the facts in tables. Prose that says “we price dogs at 240 and cats at 160, with a discount for young animals” is harder to read correctly, for a person and for a model, than two columns with a row each.
The example product insures an animal, so the document has a table of what it records about one: what we record, how it should be captured, and whether it is mandatory.
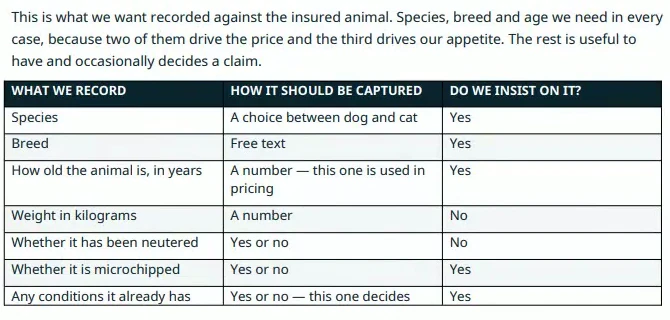
“A choice between dog and cat” is enough to produce a dropdown. “A number, this one is used in pricing” is enough to produce a numeric attribute flagged as a rating input. You are not writing a specification in disguise; you are being specific in English.
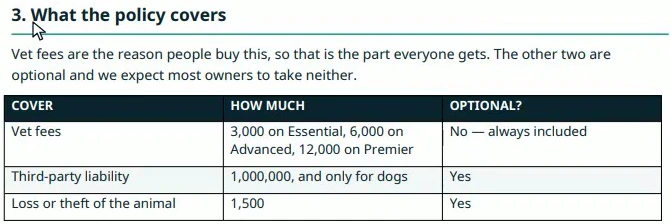
Section three is the covers, with a limit each and a note on whether they are optional.
Section four is the price. A starting figure per species; an adjustment for age as a table of bands; an adjustment for the level of cover; then the loading, the fee, the tax and the floor, in the order they apply.
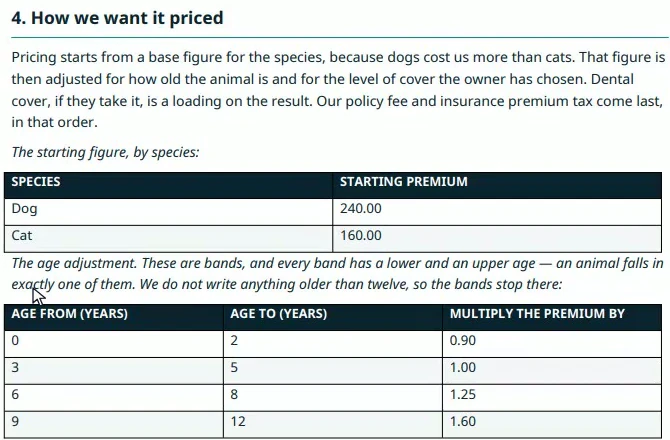
Give each band an explicit from and to. It is the one place where a loose phrase (“a discount under three, a loading over eight”) turns into a pricing defect that is invisible until someone audits a quote.
Two more sections, and the second is the one most requirements documents never have: the rules, and the journey.
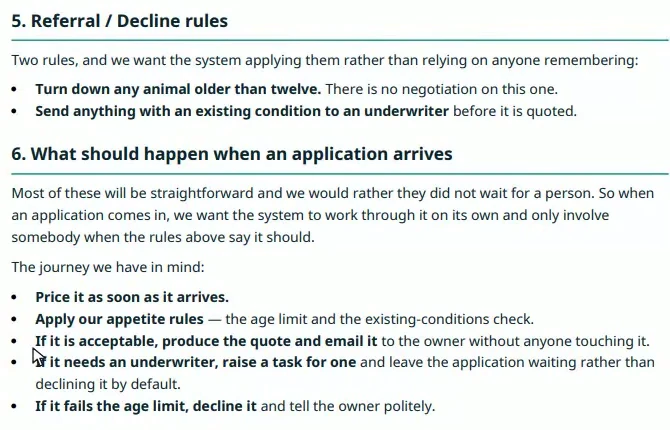
Five bullets - price it, apply the rules, quote and email it, raise a task, or decline it politely - is a workflow. It is worth writing even if nobody has ever asked you for one, because it is the section that decides whether the product is straight-through or a queue of manual work.
On the other side is the product, created and named and nothing else. Its overview is a row of zeros: no risk types, no coverages, no plans, no forms, no rating, no rules, no workflows.
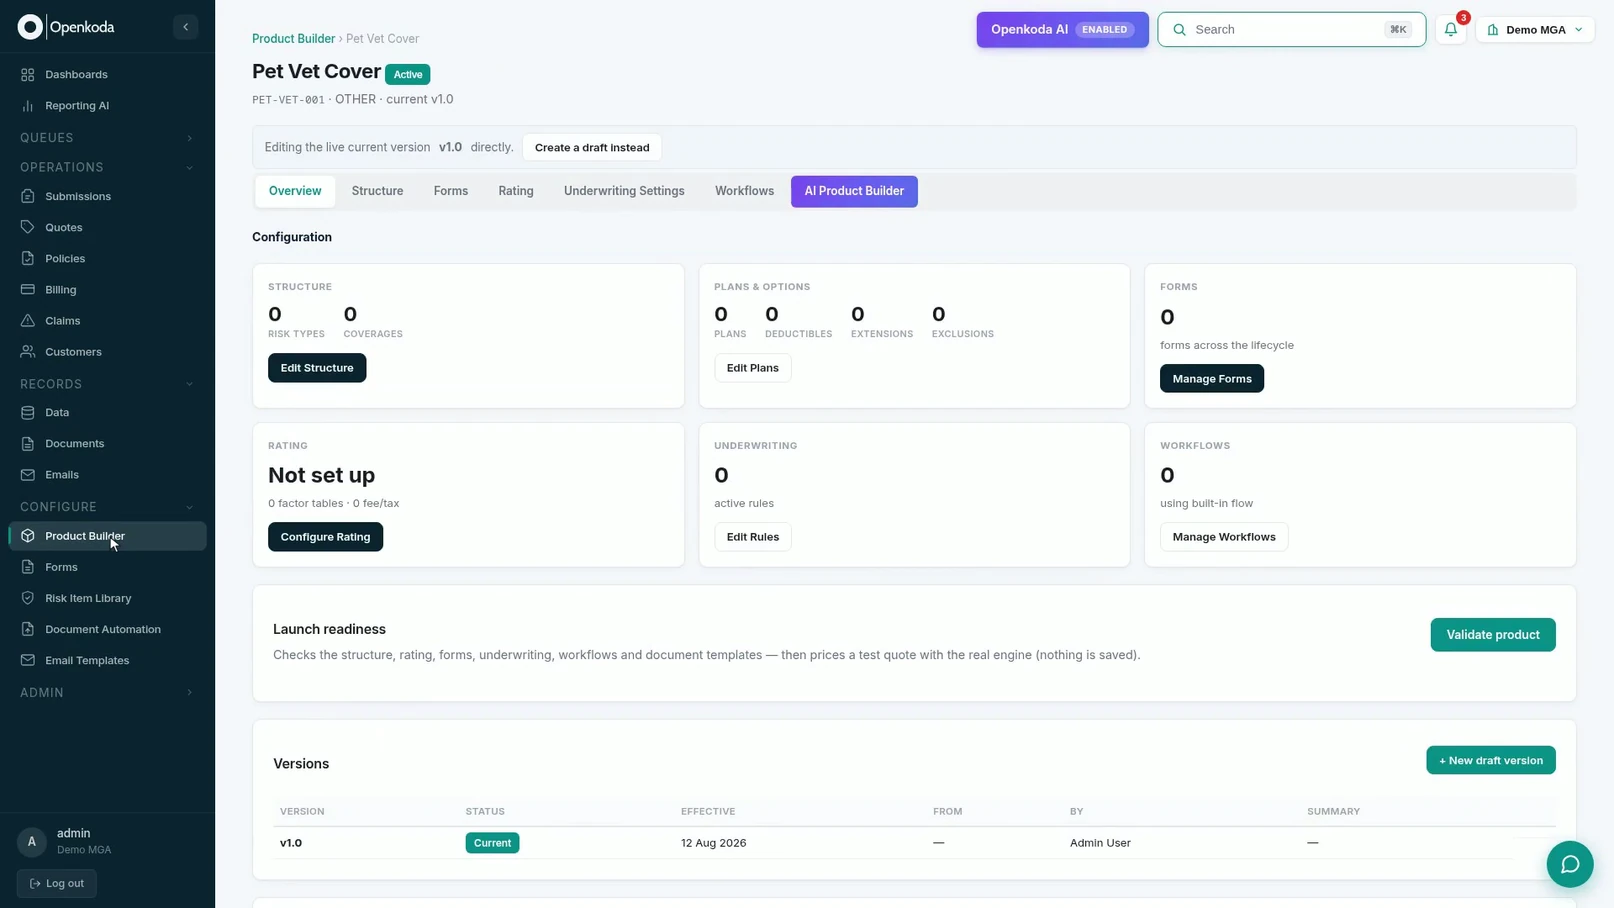
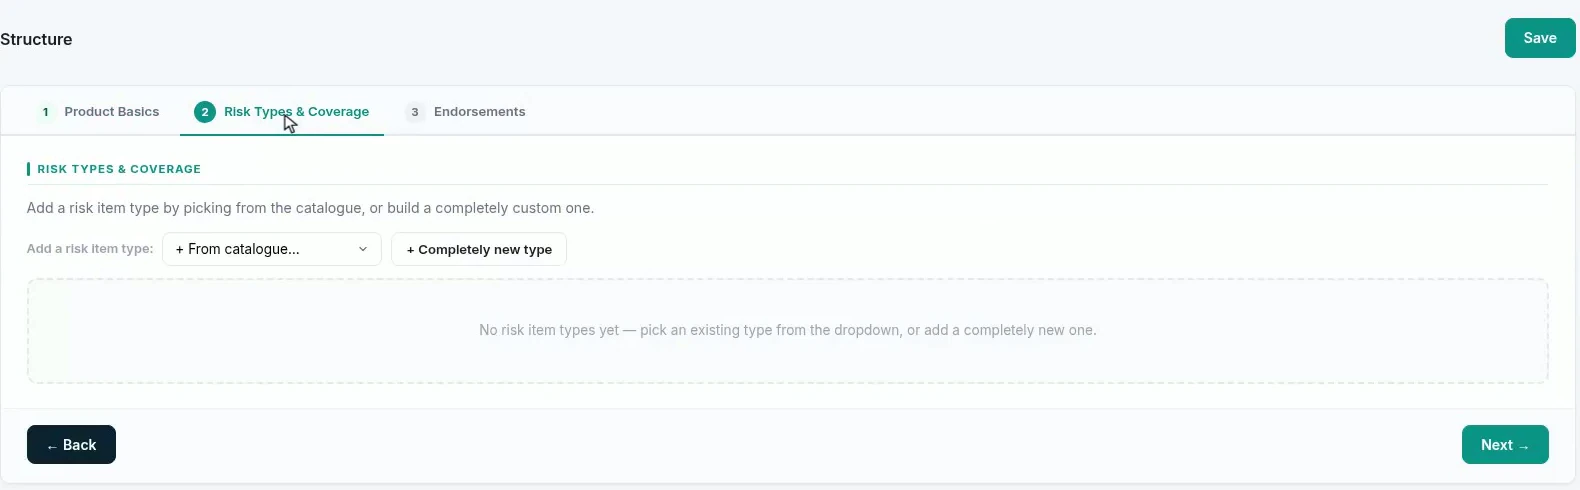
The tabs behind it are empty in the same way. Worth a look before you start, because it is what makes the after picture meaningful.
Open the AI Product Builder on that product, attach the document, and say in one line what you want done with it.
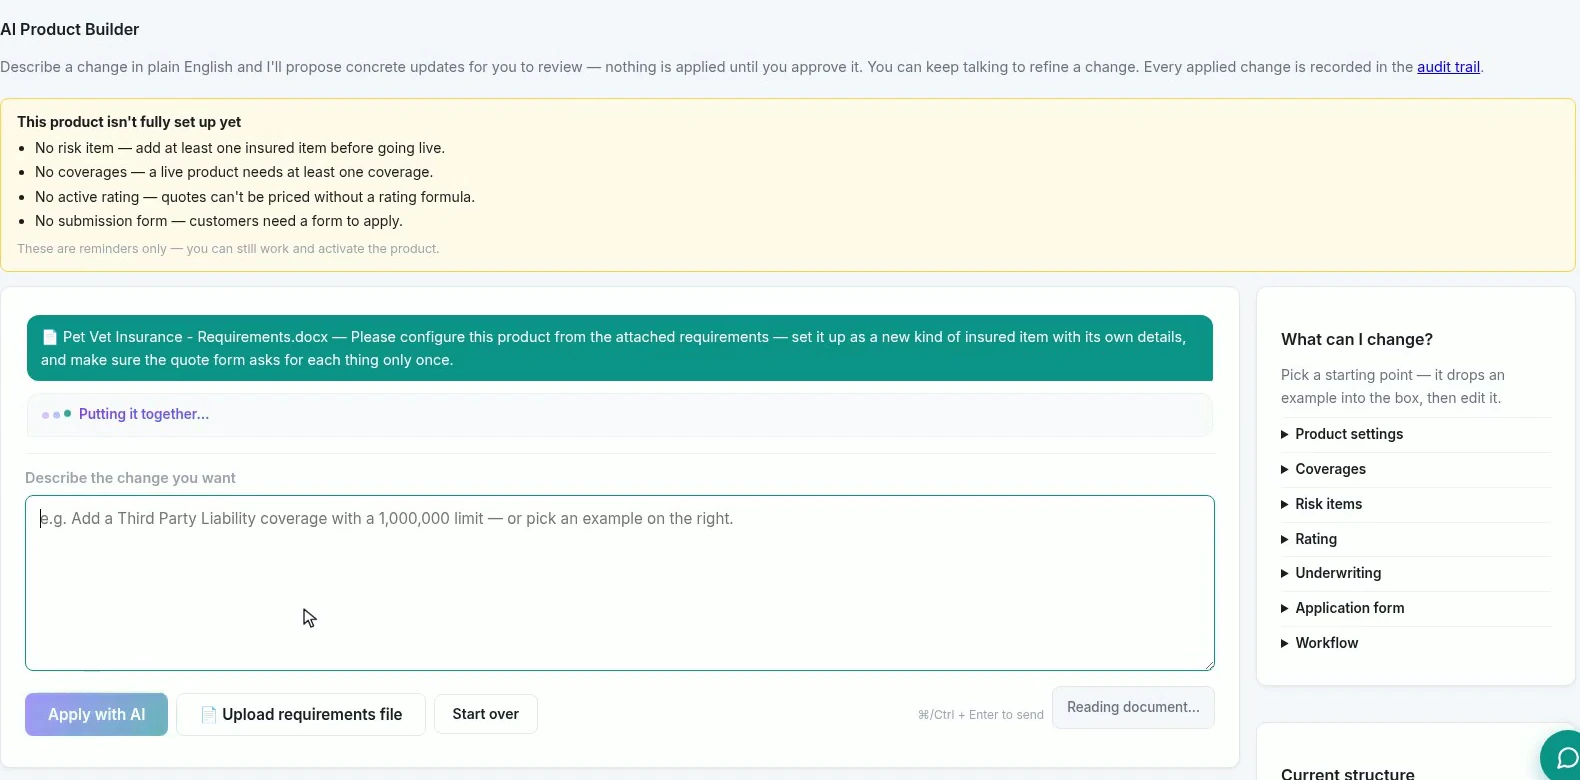
The instruction here is worth copying in shape: configure this product from the attached requirements, set it up as a new kind of insured item with its own details, and make sure the quote form asks for each thing only once. It says what to do with the document and names the one judgement call the document itself left open.
Nothing has been applied yet. What comes back is a proposal: a paragraph saying what it intends, then one row per change - what the product says today, what it would say instead, and a tick box.
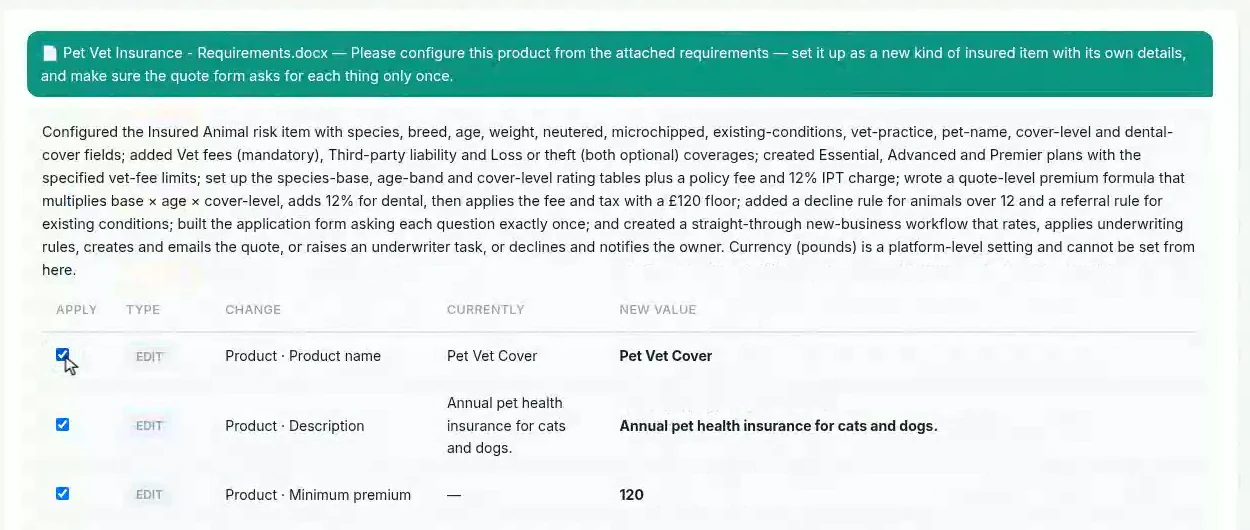
Read the summary first and check it against your own document, section by section. It is the cheapest review you will get: a paragraph against six, before anything exists.
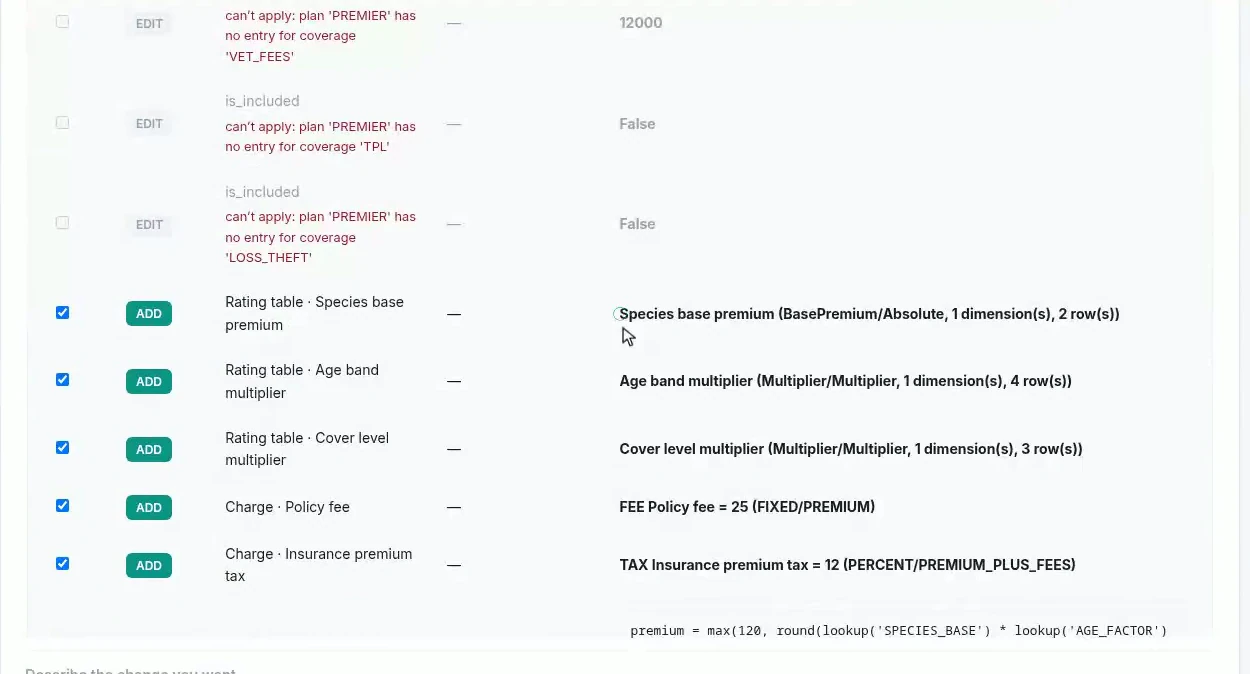
Two things to look at closely here. The greyed rows: those are changes the builder could not apply against the product as it stands, each with its reason. They are not silent failures, and a handful of them is normal, because some things cannot exist until the things they hang off do. And the codes: SPECIES_BASE, INSURED_ANIMAL, pet_age. Your document named none of those. They are the builder’s invention, they differ between runs, and they are worth reading now because they are what every later screen will show you.
Untick anything you disagree with; the button applies the rest.

Thirty-six is this run’s number, not a specification. Give the same document to the same builder twice and you will get two proposals that differ in their counts, their codes and sometimes how they band a table, which is exactly why the rest of this article is six steps of checking rather than a victory lap.
Start with what the product insures. Every attribute from the document’s table is there, typed, and marked for whether it is required and whether rating depends on it.
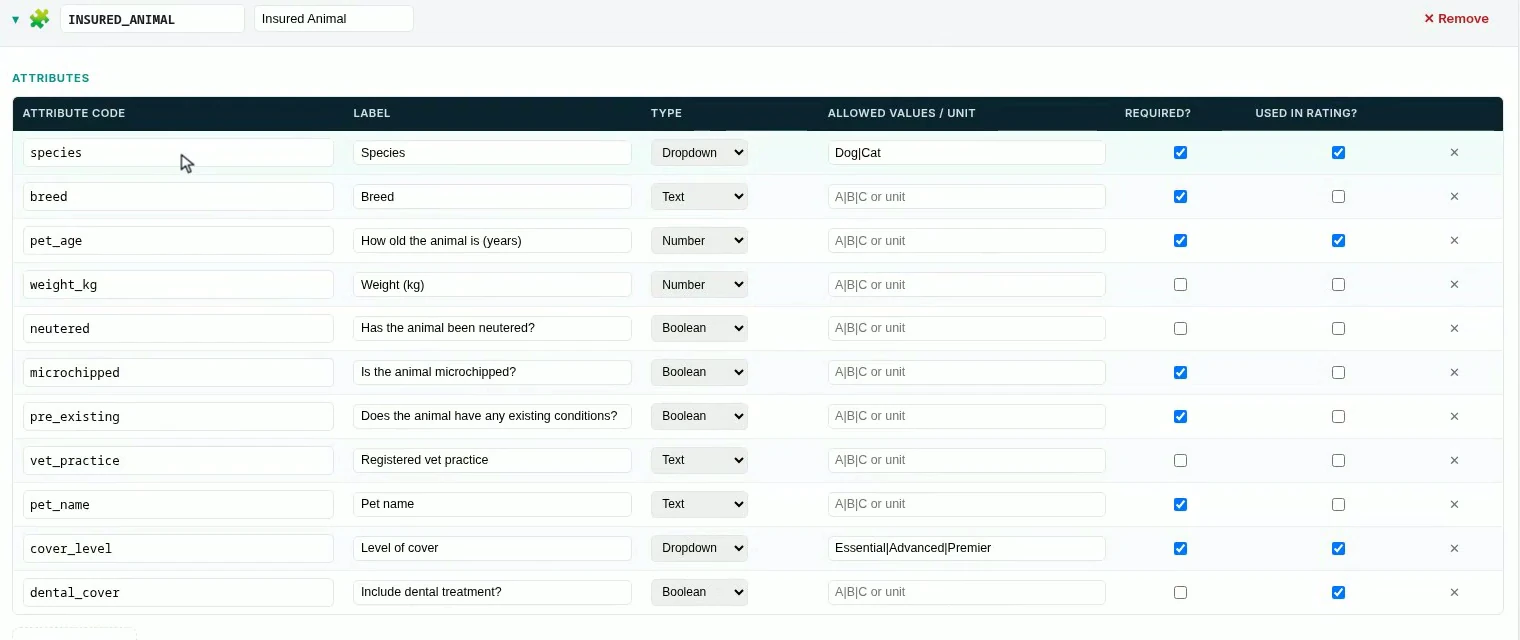
Check three columns, in this order: type (is species a dropdown with the right options?), required (does it match your “do we insist on it?” column?), and used in rating (every field your pricing section mentions, and nothing else). The third is the one that bites - a rating input nobody collects is a quote that cannot be priced. The same description step carries a stranger risk just as well, as in the tutorial on creating an AI insurance agent product.

The document’s two pricing tables are now two rating tables, and the age table is banded the way the document banded it: a from, a to and a factor per row.
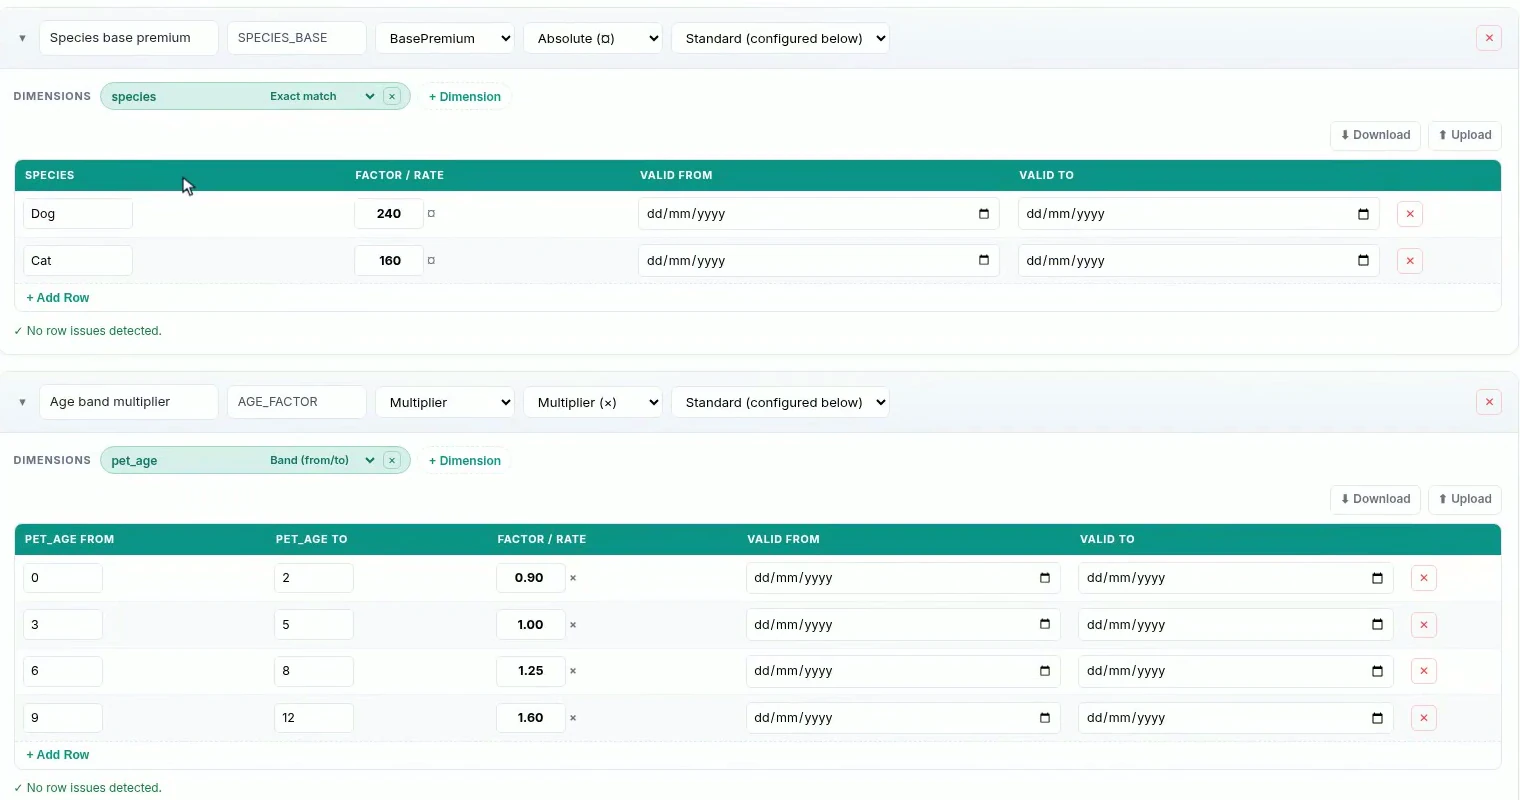
Check the numbers against the document cell by cell. This is the one place to be pedantic, because these are your figures, not the builder’s, and an ordinary-looking table that is wrong prices every policy you write. Check the bands too: four rows covering 0-2, 3-5, 6-8 and 9-12 with no gap and no overlap. Two open-ended rows instead of four bands is a real failure mode, and it looks fine until you rate an eight-year-old.
The paragraph of prose about pricing has become one line the rating engine executes.

Read it against section four in order: base, age, cover level, dental loading, and the 120 floor from section one. The fee and the tax should not be in it. They are charges applied after the premium, and a formula that has swallowed them charges them twice.
Then stop reading and price something. The test panel rates a sample against the configuration on screen.
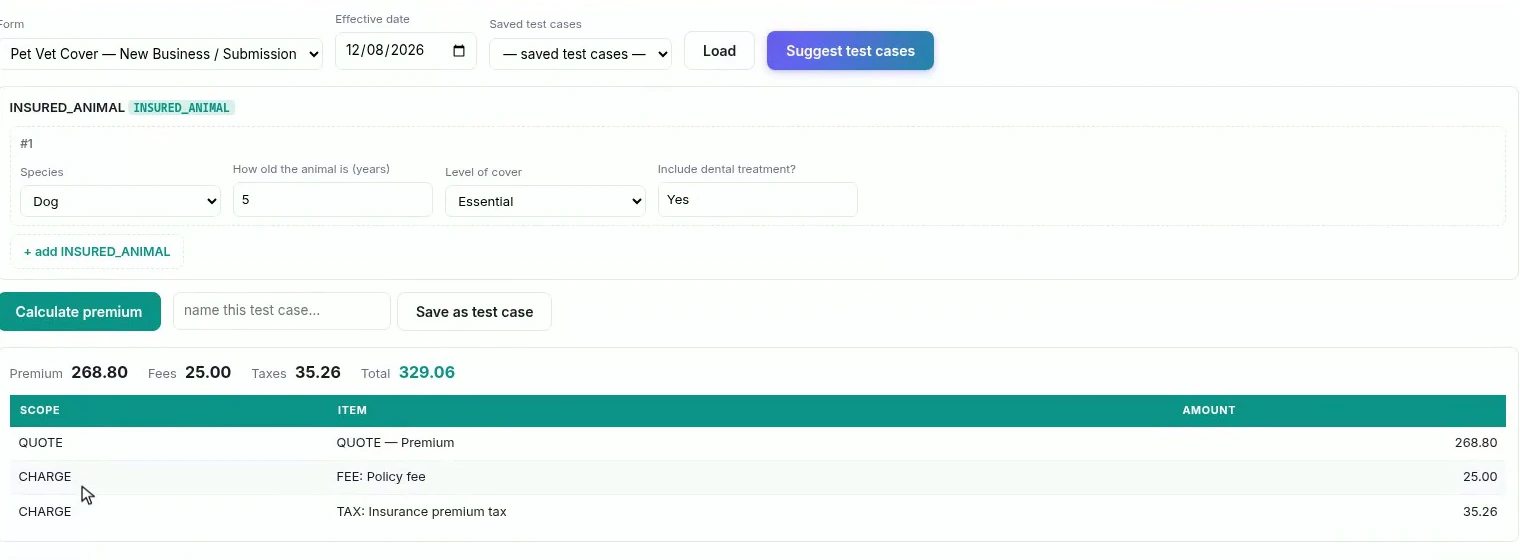
Do the arithmetic yourself once: a dog starts at 240, a five-year-old sits in the 3-5 band at 1.00, Essential is 1.00, and dental adds 12%, which gives 268.80. The fee is 25.00, so tax at 12% of 293.80 is 35.26, and the total is 329.06. Every number on that screen traces back to a cell in the document. If one does not, you have found the defect now rather than in your first month of live quotes.
The form asks the animal’s questions, each one once, which is what the document asked for in a sentence and what a duplicated question does to a conversion rate.
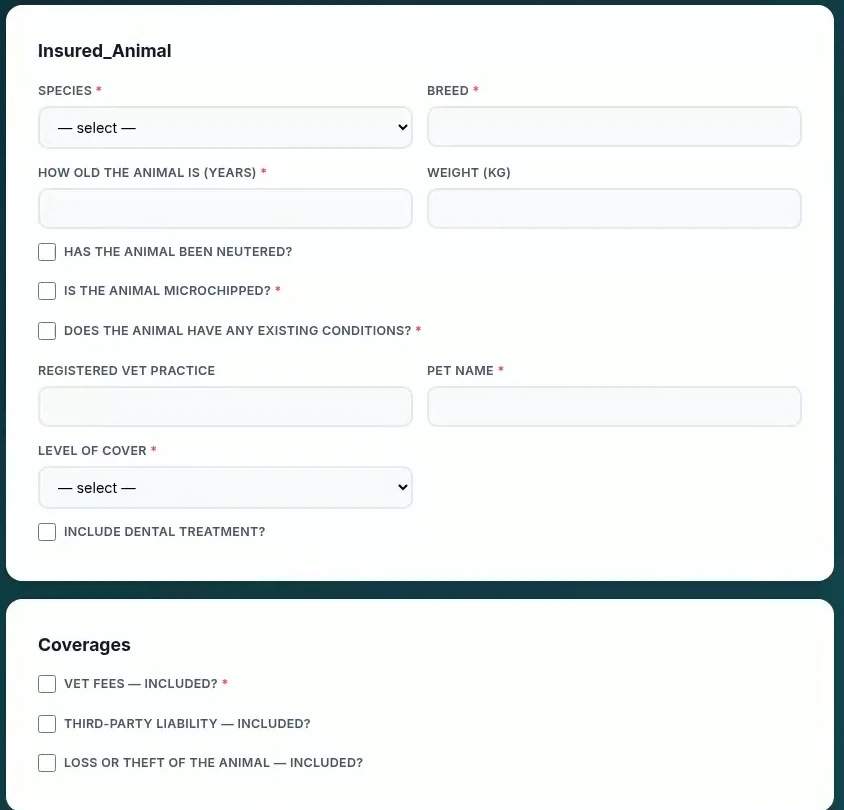
Check it as an applicant would, not as a configurer: are the required markers on the things you actually need, and is anything being asked that the customer cannot reasonably know?
Both rules from section five are typed and live: one declines, one refers.
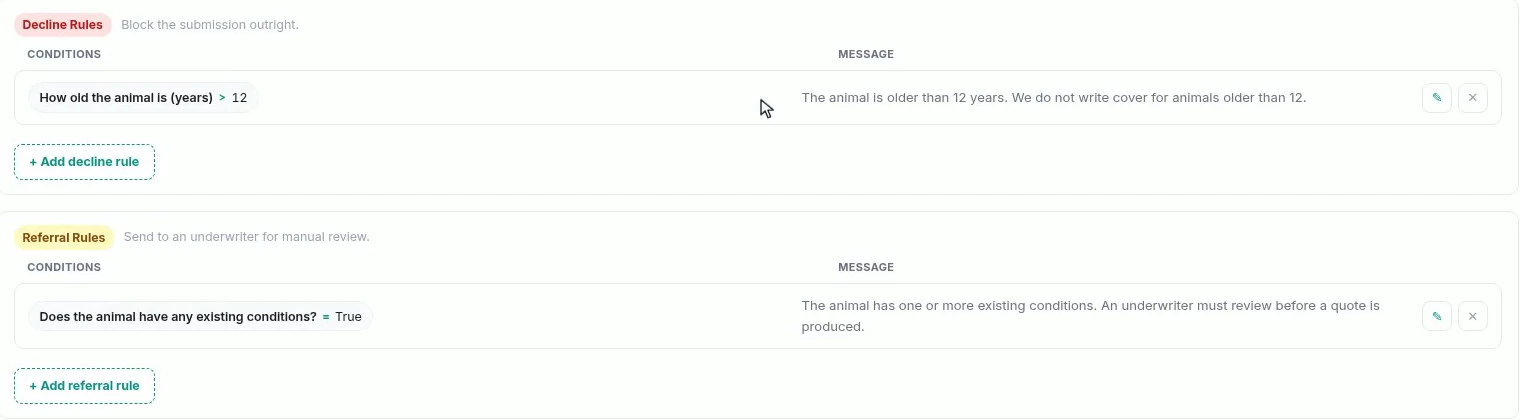
Check the boundary rather than the rule: the document says decline anything older than twelve, so a twelve-year-old must still be quotable. Greater-than versus greater-or-equal is the classic one-character difference between what a document says and what a system does.
And the five bullets of prose are a workflow: the trigger, the rating, the decision that reads those same two rules, and three branches.
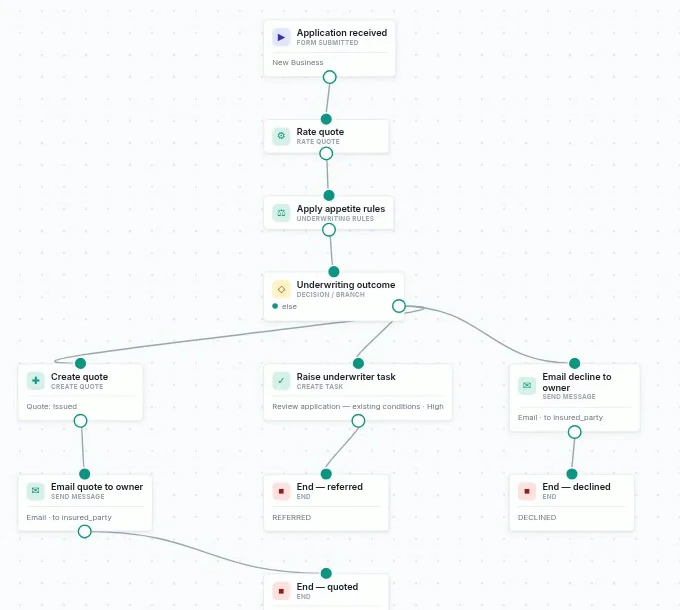
Follow each branch to an end. Three outcomes were described, so there should be three ends - quoted, referred and declined - and no path that stops in the middle. Nobody drew this; it was a paragraph.
The interesting claim here is not that a model can read a Word file. It is that a requirements document already contains a configured product, and that the distance between the two is transcription: slow, unreviewable, and done by whoever is free rather than by whoever wrote the requirements.
Handing the document over closes that distance in one pass, but it moves the work rather than removing it. What was a week of typing becomes an hour of checking, and the checking is real. The proposal is reviewable before anything changes, the codes are the builder’s own invention, the numbers have to be reconciled against the document’s tables, and the boundary on a decline rule still deserves a person’s eye. That is a good trade, but only if you actually do the six checks.

Describe an AI agent as insurable attributes - pinned model version, autonomy, spending authority, guardrails - then read the cover, rules and rating built on them.
Revise a live policy schedule in twelve steps: write the wording in Word, map the placeholders, activate the version, and let a workflow send the PDF.

Five businesses on one installation, a role built from three ticks out of seventy-nine, and an audit log that records the walkthrough that built it.
Book a live, personalized demo with our product team - tell us your use case and see the platform work with your data. No commitment.