
How to Manage User Roles and Create Custom Permissions in Your Application
Managing user access and roles is a cornerstone of effective business operations, especially in the insurance industry. Insurance companies deal with sensitive customer data, detailed policy information, and financial records on a daily basis. Without a robust system to control who can access or modify this data, the risk of security breaches, compliance violations, and operational inefficiencies skyrockets.

Why is User Management Important in Insurance Software?
User management is a critical feature in insurance software to ensure data security, maintain regulatory compliance, and streamline workflows.
By defining and controlling access to data and functionalities – such as claims, policies, or financial records – it minimizes risks, prevents unauthorized actions, and improves team collaboration and productivity.
Take policy management, for example. An agent needs access to client information to manage policies, but shouldn’t be able to view or modify financial data. Similarly, a financial manager needs access to financial reports, but doesn’t need visibility into client personal details.
Without proper user role management, sensitive information could fall into the wrong hands, leading to errors or potential breaches.
This is where the Openkoda platform excels. With its easy-to-use and customizable user role and permissions management capabilities, Openkoda ensures that each team member has access only to the tools and data they need.
In this blog post, we’ll show you how to manage user roles and access, as well as customize and add new permissions with Openkoda.
Follow the steps below, or watch our video tutorial:
Step 1: Configure Permissions
In Openkoda each role is configured with a tailored set of permissions (we also call it privileges) that determine what actions users can perform in that role.
So before assigning a specific role, it’s important to define the set of permissions associated with that role.
Go to the Privilege section, where you can configure what actions are allowed in each role and to what extent.
In this example, a user with the Agent role can access a client’s personal data, but not financial information.
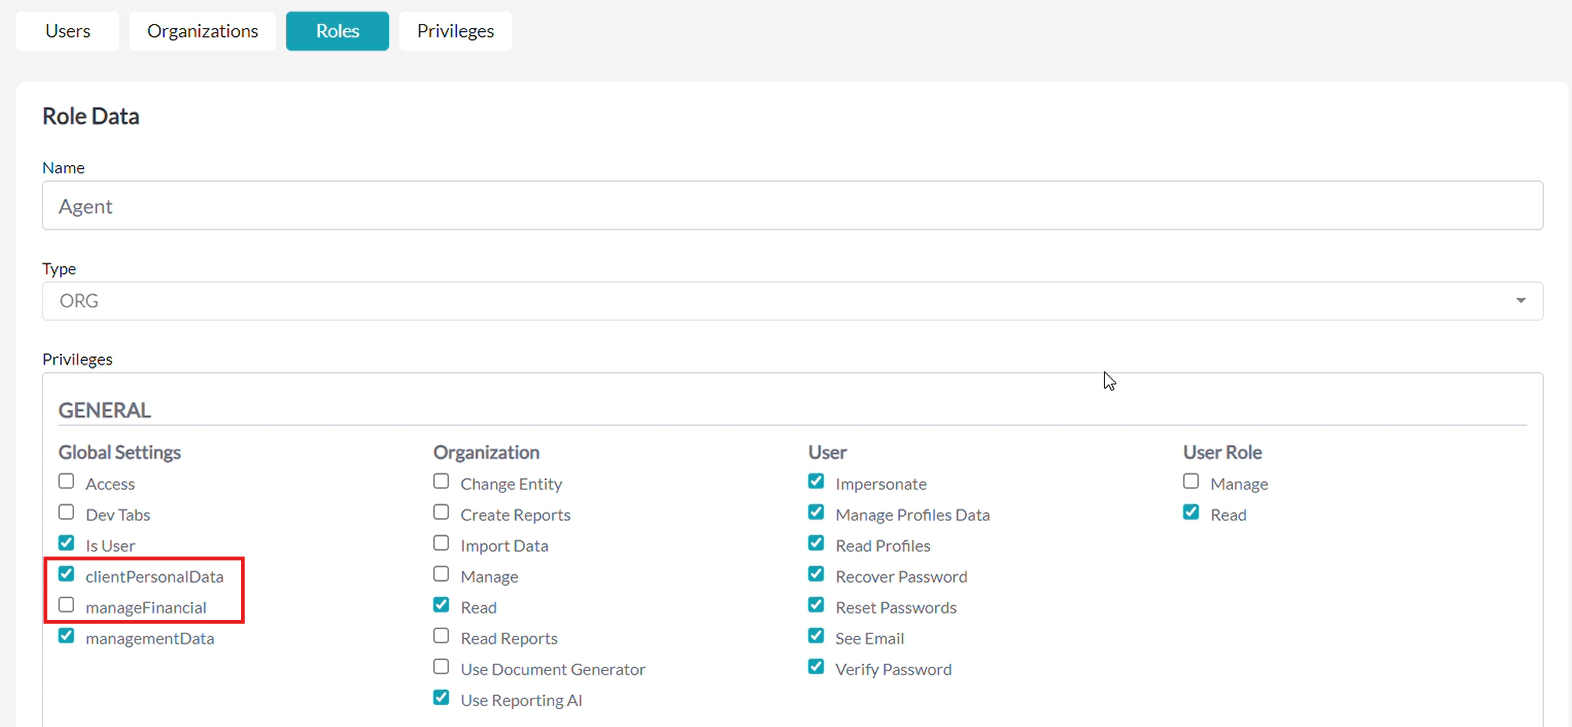
Openkoda allows you to manage predefined privileges and create your own custom privileges for more precise control. You will learn how to create custom permissions later in this tutorial.
Step 2: Assign User Roles
Now go to the User screen.
The Users screen in Openkoda shows how different roles are assigned across your organizations. Each user’s access and responsibilities are aligned with their role, making it easier to track permissions.
So let’s assign the following user roles:
- Agent role to the user Julia
- Financial Manager role to the user Richard.
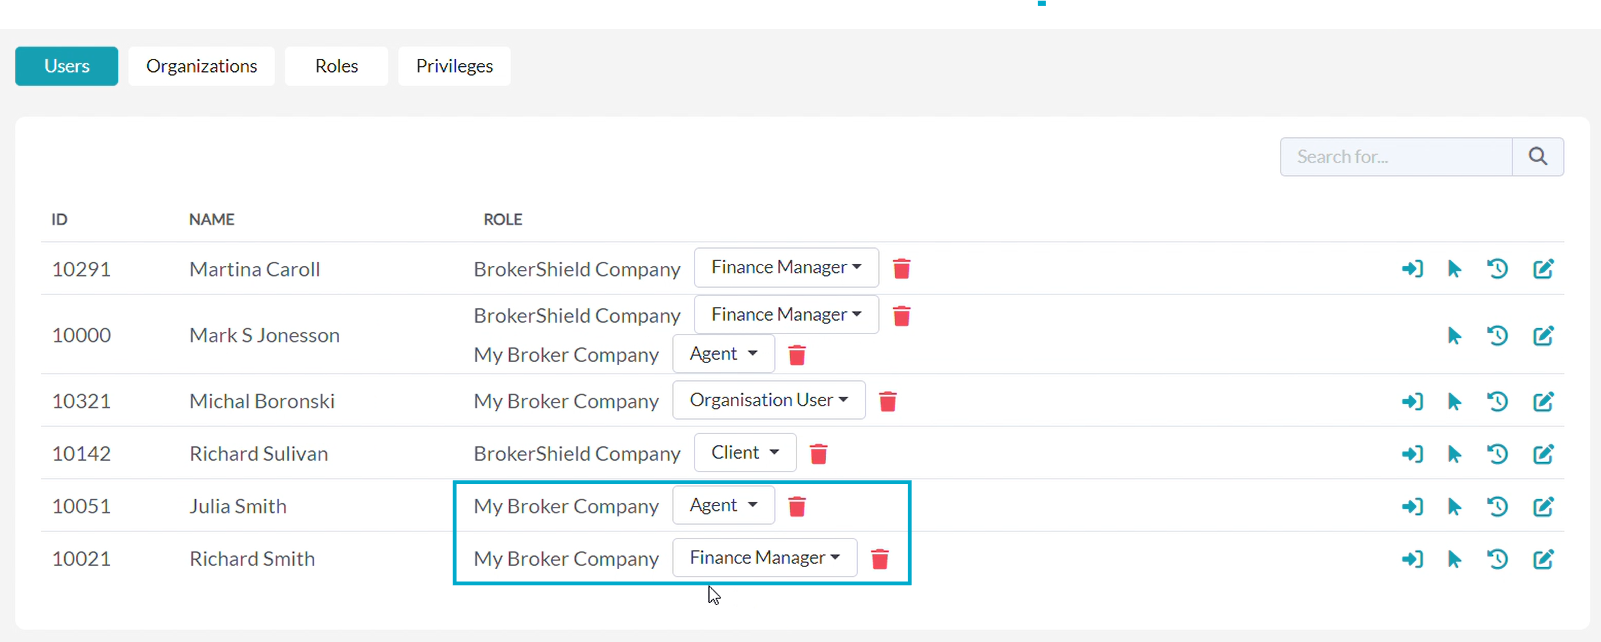
With a single click, the roles are updated, and they’ll instantly see changes in their dashboards and access to data.
Step 3: Manage Data Visibility
Now, we can observe how dashboards vary based on different user roles.
Agents have access to policy and claims management features. This is Julia’s dashboard view:

Financial Managers have access to critical financial data that Julia cannot access, including tables such as: Expenses, Cost Center, or Commission rules.
This is Richard’s dashboard view:

[Learn also: How to Build a Personalized Insurance Policy Dashboard]
Step 4: Manage Access to Attributes
Openkoda also allows you to restrict access to individual attributes.
For instance, the agent Julia can view basic quote data:

While Richard can access additional details like risk scores:

The precise visibility of specific data attributes ensures that sensitive information remains accessible only to authorized users.
Step 5: Manage Access to the Application Features
User roles also define access to the system’s features.
For instance, financial manager Richard can access advanced tools like Reporting AI.

While agent Julia does not have access to this feature.

With these settings, specialized tools are only available to those who need them. It optimizes resource allocation and prevents misuse of advanced analytics tools.
[Watch the demo about the Reporting AI tool]
Step 6 (Additional): Add and Modify Custom Permissions
Openkoda allows you to take user management a step further by creating custom permissions for advanced data access control.
This feature ensures flexibility and precision in user role management. It is especially useful for addressing unique scenarios or specialized requirements specific to your business.
In this case, we’ll take a few steps back and review how the custom privilege for our Financial Manager, Richard, was created.
Learn how to do it below, or watch a special tutorial video:
6.1. Add a new privilege
First, go to the Security section in Openkoda, then navigate to Privileges Management in order to add a new privilege.

Then, introduce the Privilege data, such as:
- Name: The unique identifier for the privilege.
- Label: A user-friendly name that describes the privilege.
- Category: Groups similar types of privileges together for easier management.
- Privilege Group: Further divides privileges within a category for more detailed organization.

In this case, we give permission to manage financial data. Once created, these privileges can be assigned to specific roles, like the Financial Manager (check step 2).
6.2. Assign the custom permissions to specific data sets
Next, we can modify the privilege by assigning it to all data entities: the Expenses table, Cost Center, and Commission rules (check step 3).
Go to the Development Kit and edit each entity by changing its permissions:
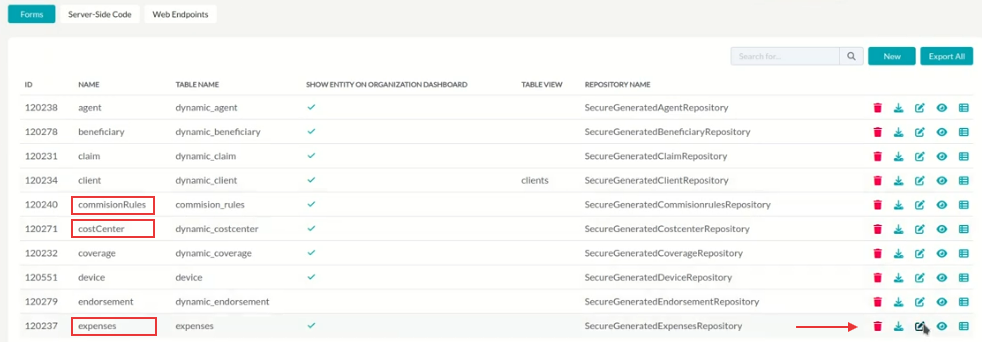
Set our new custom permission to “read” and “write” to ensure that only users with the Manage Financial Data permission can interact with these data sets.

6.3. Restrict access to specific data attributes
Now, we will implement restrictions on access to certain data attributes in the Agent table.
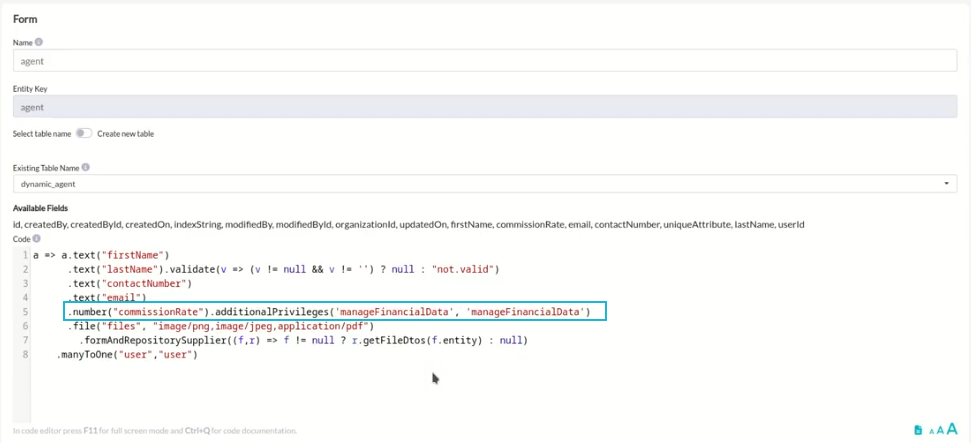
In this example, we’ll limit access to the Commission Rate attribute on the Agent table, ensuring that only users with the Manage Financial Data permission can view this information.

6.4. Limit access to application features
The final adjustment for today is to restrict access to specific application features.
Earlier in this tutorial, we saw how to restrict access to the Reporting AI feature. Now, I’ll show you how to restrict the visibility of the data visualization on a dashboard, so that only the financial manager can see the sales data charts on his dashboard.
Go to dashboard CMS and add a restriction that only users with the Manage Financial Data privilege can view the sales chart component on the main organization dashboard.
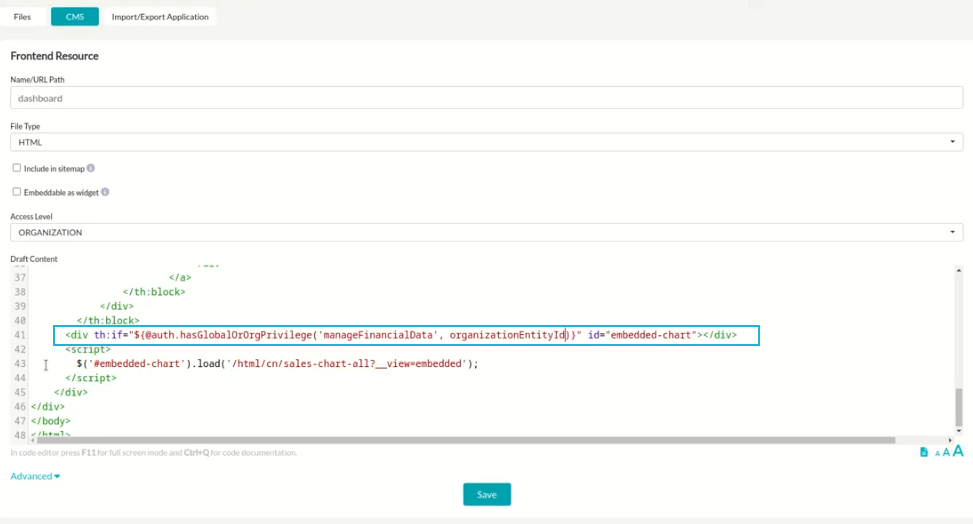
Now, only users with permission to manage financial data can see this chart in the dashboard below:
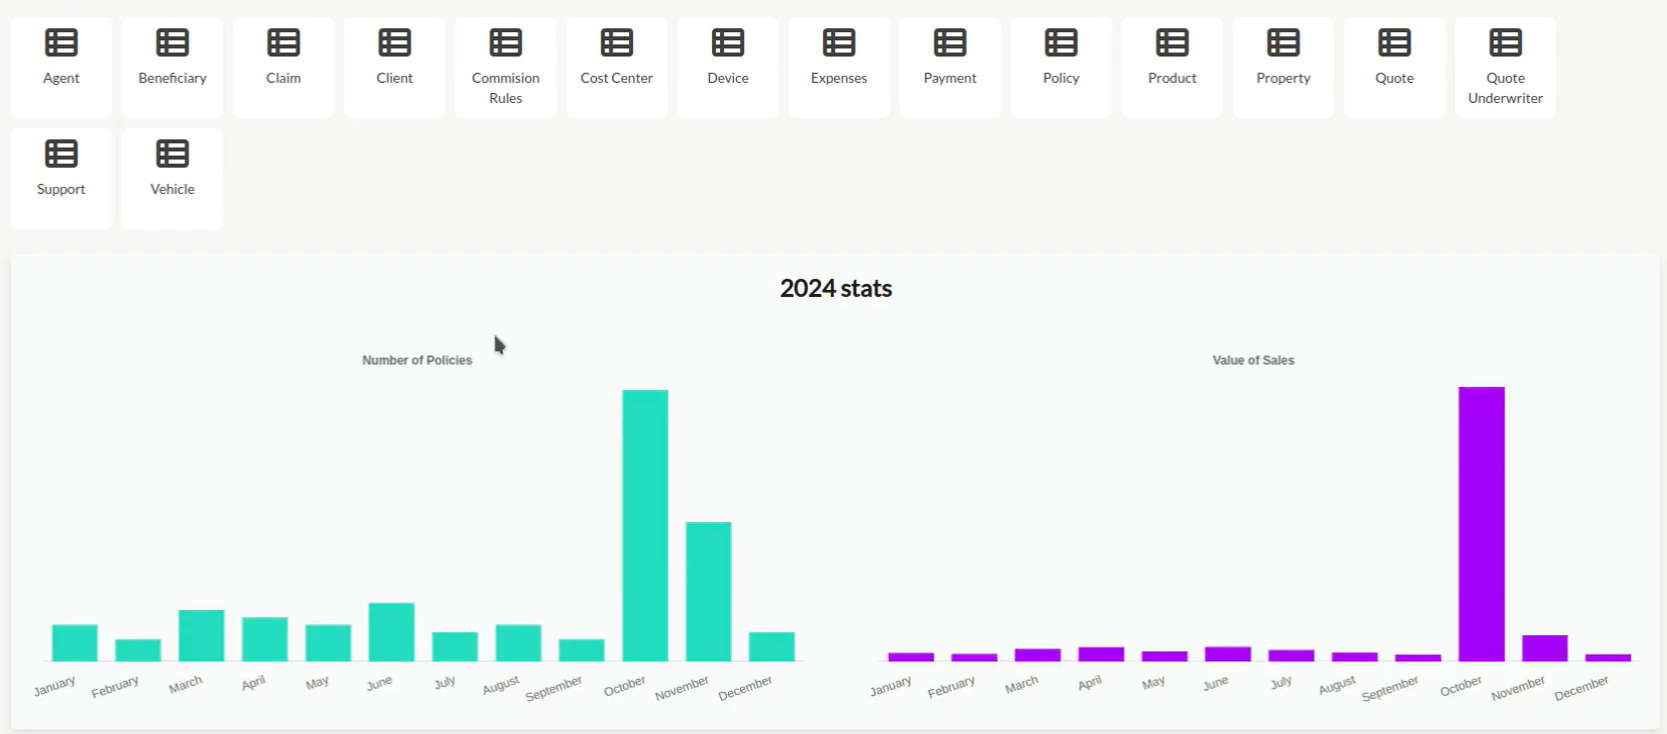
Custom permissions provide unparalleled flexibility and ensure that sensitive information stays protected at all levels, aligning with compliance requirements and maintaining client trust.
Manage User Roles and add Custom Permission with Openkoda
Managing user roles and permissions is fundamental to maintaining the security and efficiency of your insurance operations. Openkoda simplifies this process by providing intuitive tools for role-based access control and the ability to customize.
With features such as custom permissions, real-time role assignment, and role-specific dashboards, Openkoda empowers insurers to create secure, collaborative environments. Whether you’re managing internal teams, multiple organizations or provide dedicated client portals, Openkoda’s user and role management system adapts to your needs, keeping your operations secure and your business agile.
Explore how Openkoda features can streamline your operations and provide the ideal solution for insurance businesses seeking innovative software and book a personal demo with us.