
How to Generate Insurance Documents with Customizable Templates
Creating insurance documents such as policies, quotes, claims, invoices, or renewal notices is often a time-consuming process. With Openkoda, you can simplify this task by using customizable templates that automatically populate with client information. This ensures that your documents are accurate and that the entire document generation process is efficient and fast. In this guide, we’ll walk you through the steps to create professional insurance documents in minutes.

Generate Insurance Documents in Minutes
Openkoda is a platform for building insurance applications – such as policy or claims management systems – faster. It comes with powerful features designed with insurance professionals in mind. One of these is Automated Document Generation, which was born from the idea of reducing errors and saving time when creating insurance documents.
Generating professional insurance documents no longer has to be a manual or repetitive task. By setting up your templates once, you can create different types of documents that pull in client and policy data automatically.
Today, we will show you how to create a policy document faster using Openkoda.
Follow the instructions below or watch the video tutorial:
Curious how this works for your use case? Book your personalized demo.
Step 1: Start with a Template
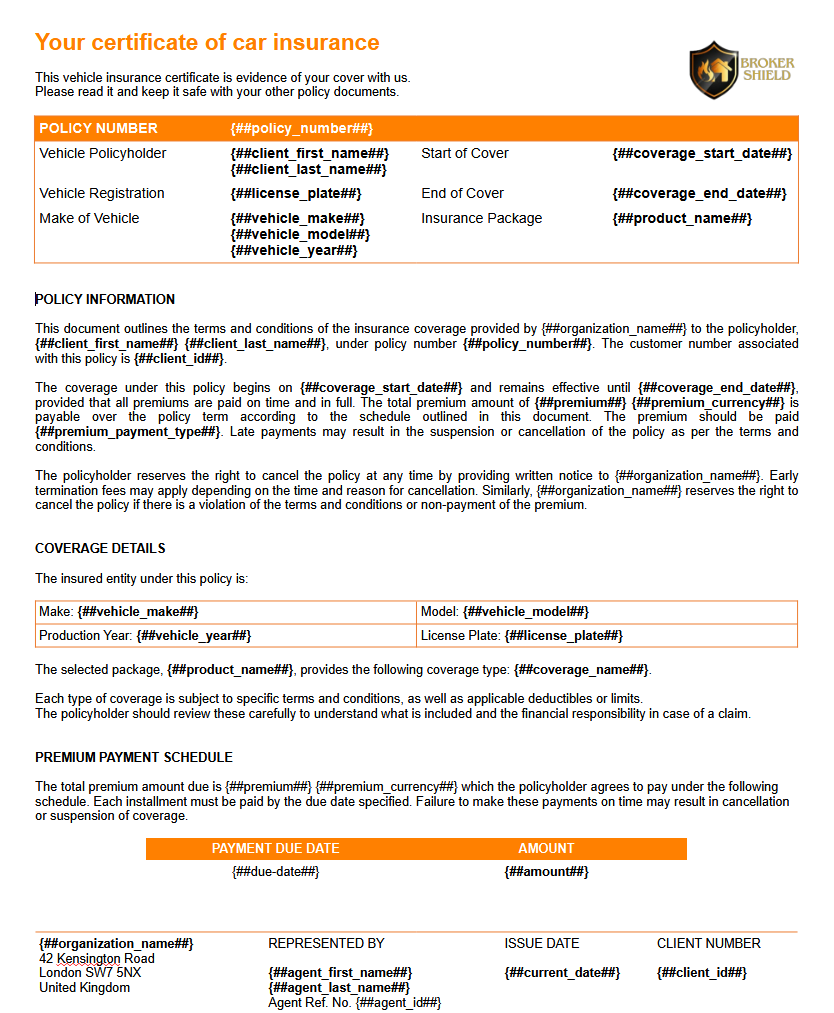
Start by opening your document template in Word. For this tutorial, we’re using a simple car insurance policy template.
Within the template, you’ll notice placeholders. These are special fields that act as markers for dynamic data.
Placeholders can include:
- Text fields (e.g., client’s name)
- Numbers (e.g., premium amount)
- Lists
- Calculations (e.g., payment schedules)
These placeholders will adapt automatically to your data, making the template highly adaptable.
Using dynamic placeholders ensures consistency in your insurance documents. It also reduces manual effort, making it easier and faster to create personalized policies.
Step 2: Upload the Template into Openkoda
Next, upload this document template into the Openkoda application. With just one click, your base template is ready for further customization.
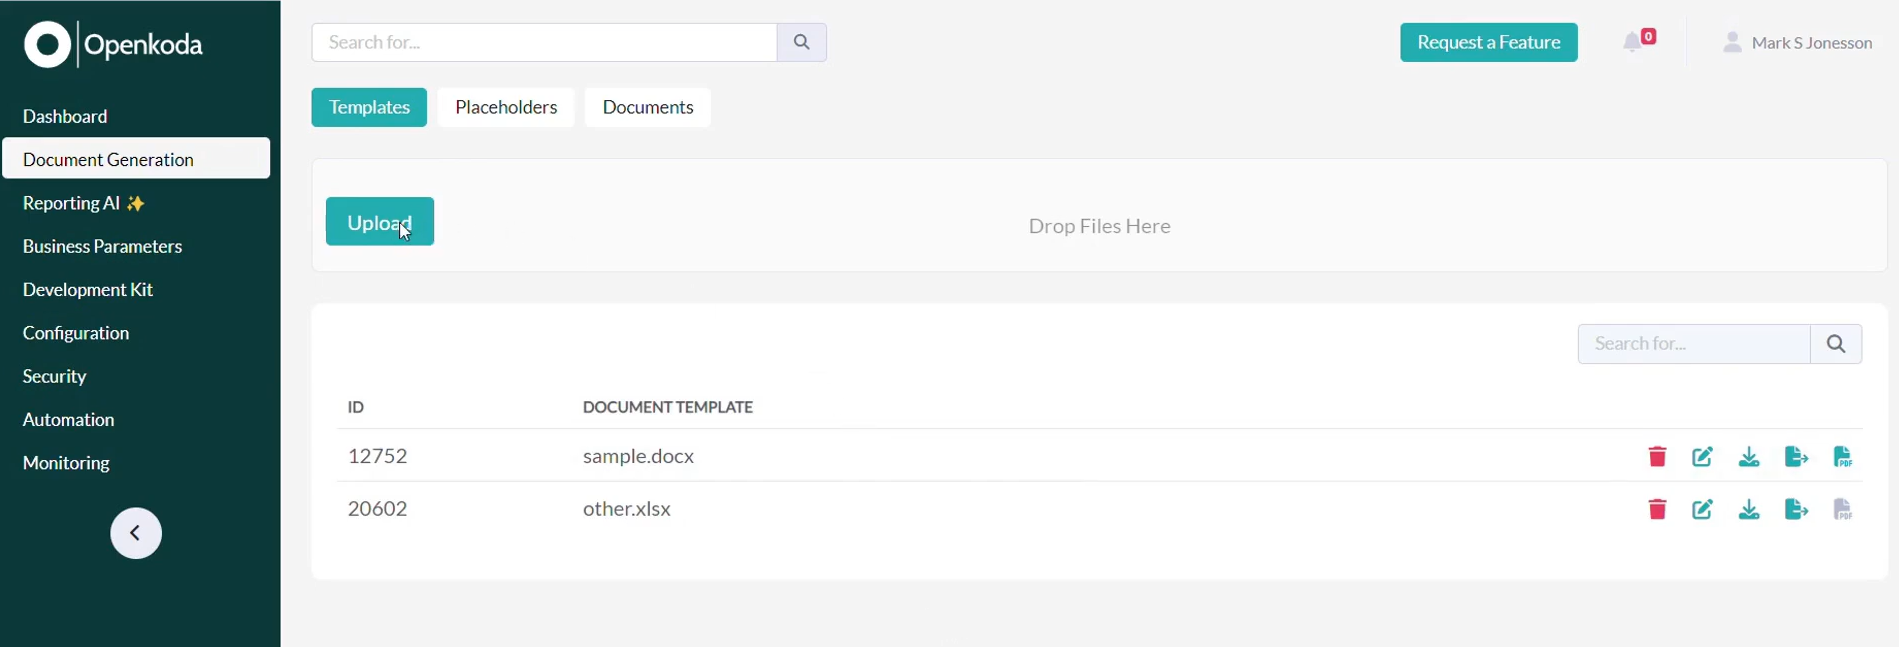
An added benefit is that one template can streamline the document generation process not only for you but also for your team members who have access.
Step 3: Assign the Template to a Document Type
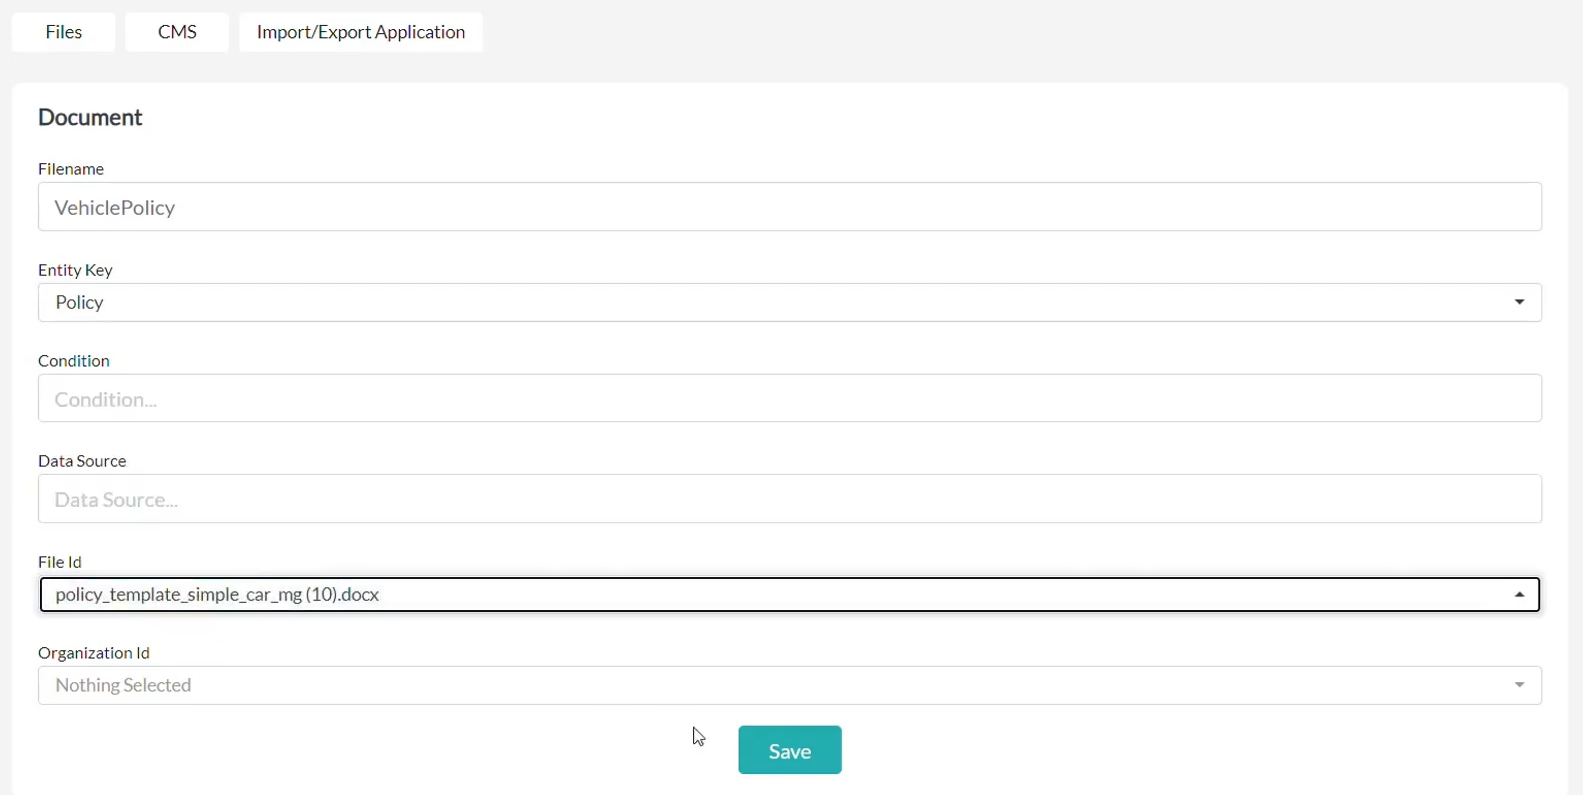
To ensure the template is used correctly, assign it to a specific document type.
For this example, we’ll assign the template to a document named ‘VehiclePolicy.’
Assigning templates to document types allows the system to determine when and how to apply the right template in the right context.
Step 4: Define Placeholder Data Sources
Now, it’s time to define the source for each placeholder.
For instance:
- The client’s first name will be pulled from their profile.
- The vehicle model will be retrieved from the policy details.
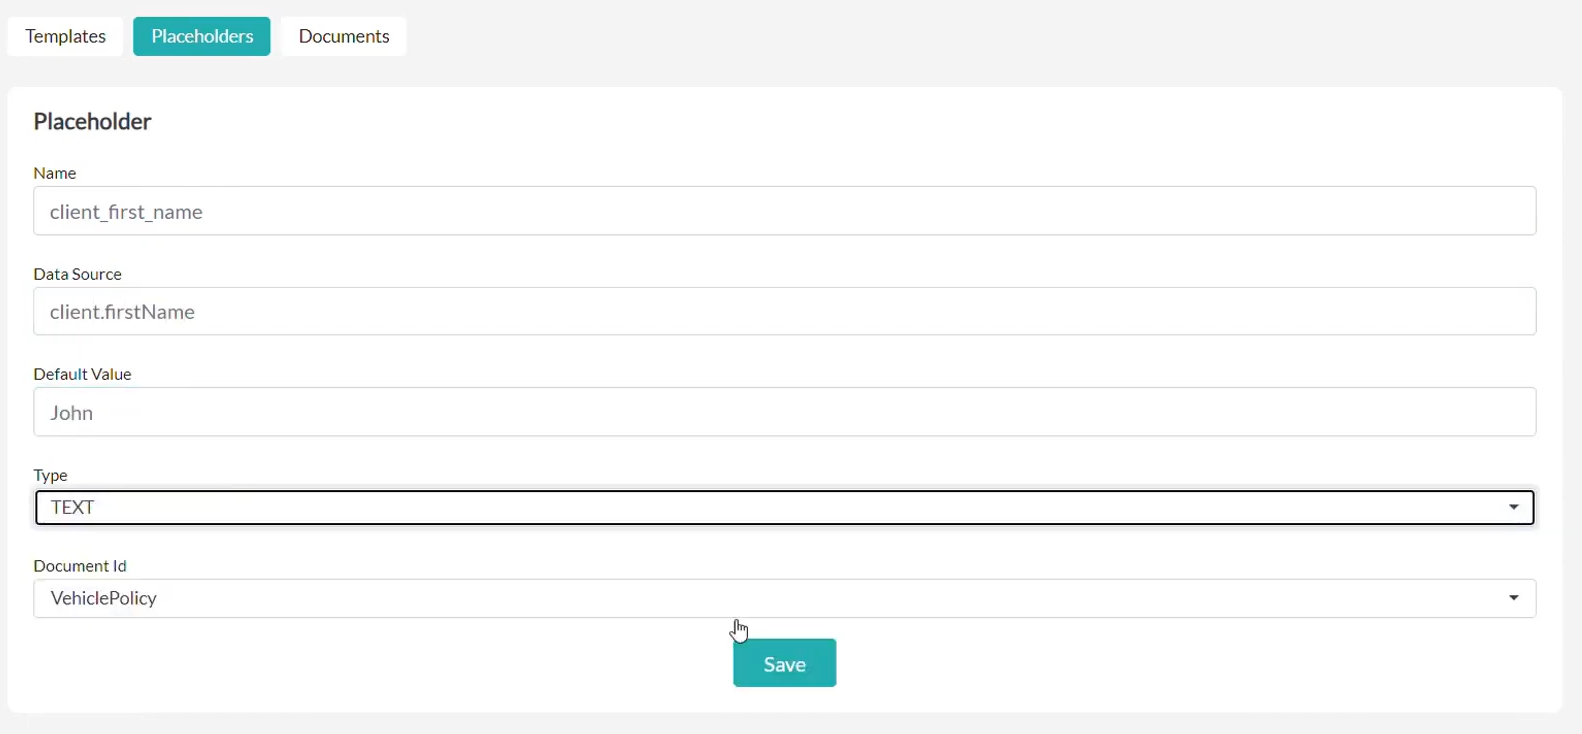
These placeholders ensure that the document is populated with accurate and updated data directly from your insurance system.

Want to see how this works in practice? Book a personalized demo.
Step 5: Configure Complex Placeholders (Payment Schedule)
Some placeholders may require more advanced configurations.
For example, a payment schedule might be calculated based on the policy’s premium amount and duration.
In this case:
1. Locate the web endpoint responsible for the payment schedule calculation.

2. Connect the endpoint to the placeholder:
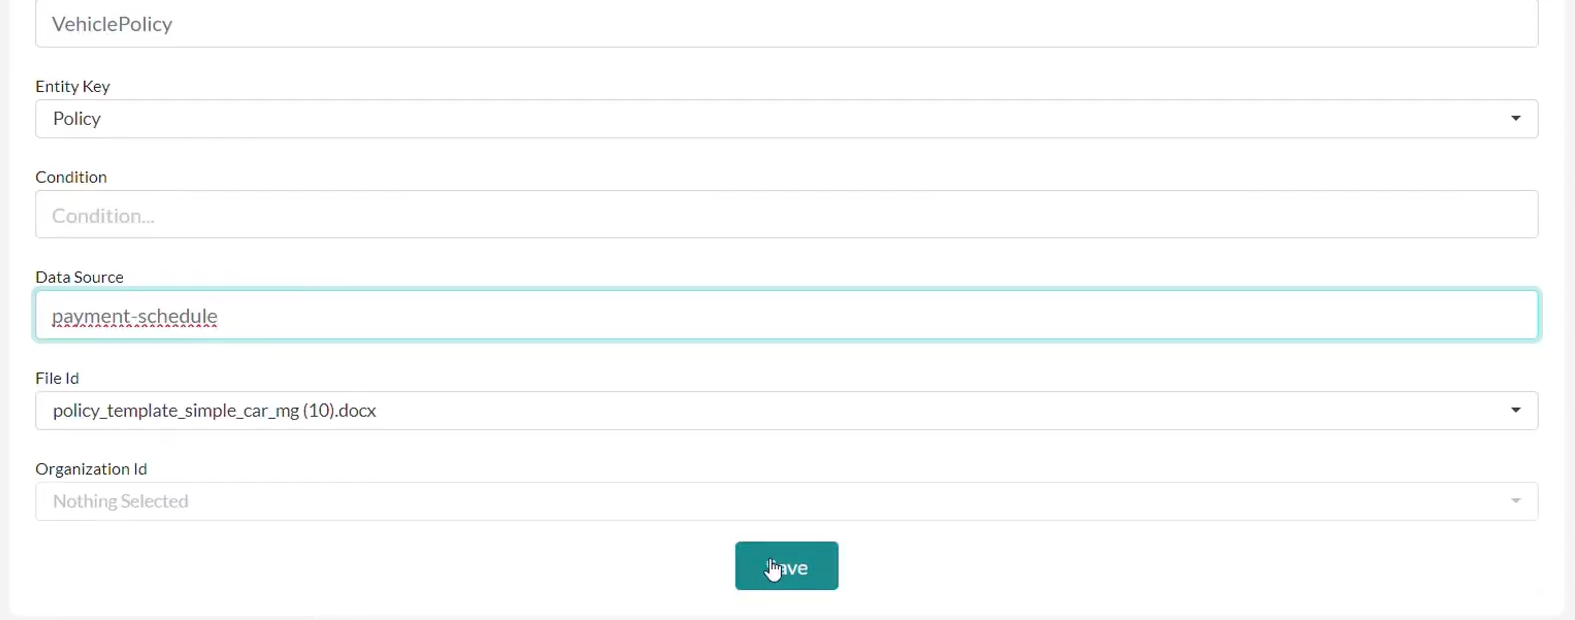
With this setup, Openkoda is able to retrieve the exact payment details for each policy.
Step 6: Check Policy and Client Details
Once the data sources are defined, we can verify the policy details in your system. This is not a mandatory step, just a double check so you can compare the data and match the information to the generated policy document.
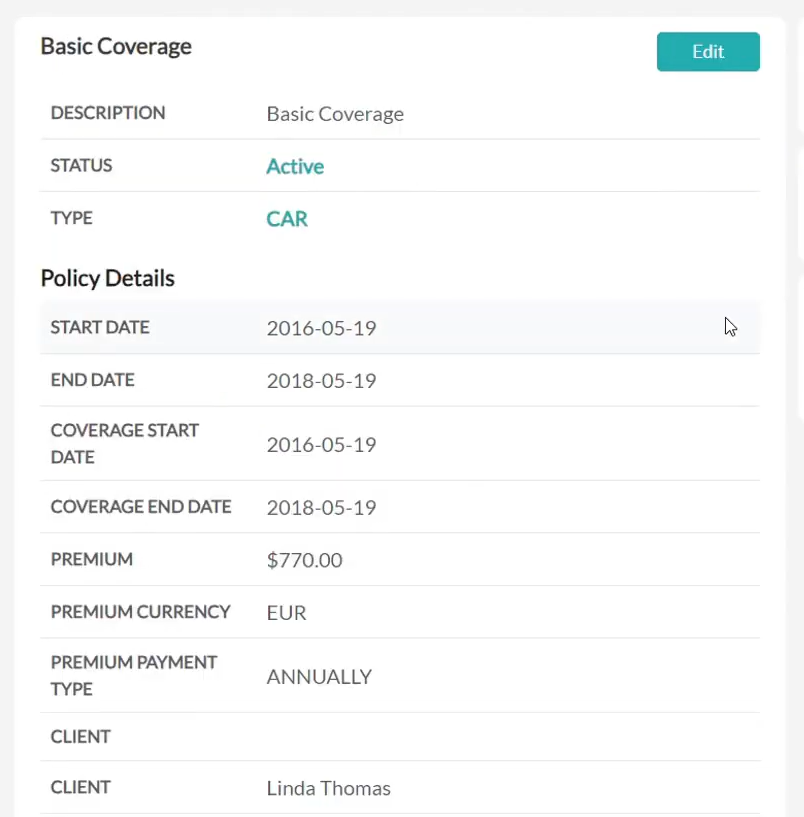
Here, we have a 2-year car insurance policy that belongs to Linda Thomas. The policy has a total premium of $770, paid annually.
The final document will automatically include all these details.
Step 7: Generate the PDF Document
We have already configured everything we need to generate the final document.
Because the Openkoda system automatically populates placeholders with relevant data from your system, you simply click “Generate PDF” to instantly create a polished and professional insurance policy document.

With the high level of configurability offered by Openkoda, you can integrate Document Generation into any workflow where documents are automatically created and distributed as part of the process.
For example, when a client fills out a quote or claim form on your website, you can automatically generate a document and send it to them immediately.
Step 8: Review the Final Document
Open the generated PDF to review the final output. You’ll see that all blank placeholders have been automatically replaced with accurate data:
- The client’s name matches their profile.
- The vehicle details, including the model and license plate, are valid.
- The premium amount reflects the policy details.
- The payment schedule is entered correctly.
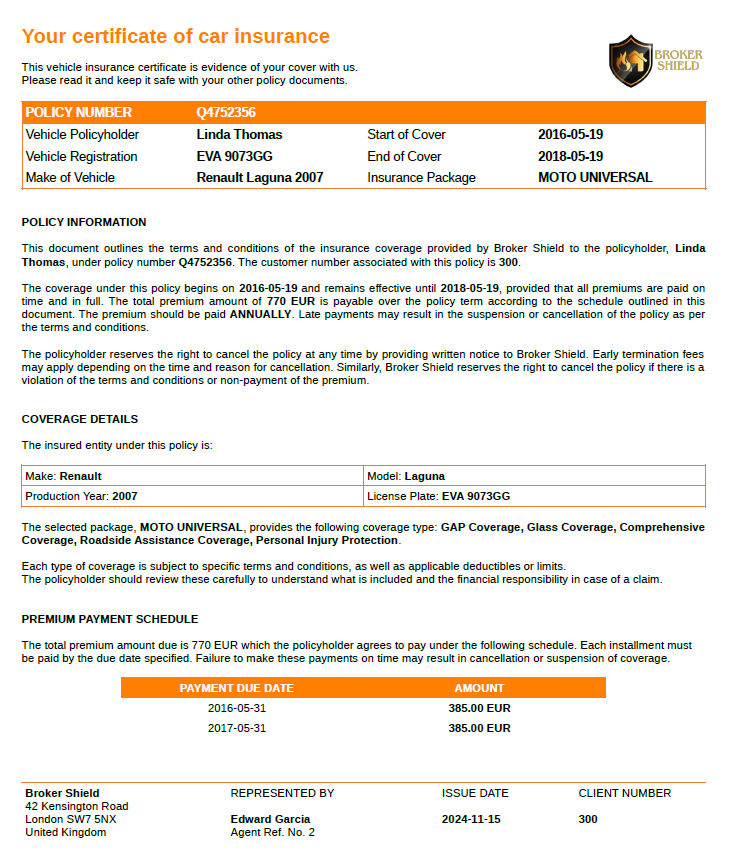
The result is a professional, error-free document ready for use and created in minutes! It meets the quality standards and client expectations.
Start Saving Time on Creating Insurance Documents with Openkoda
With Openkoda, generating insurance policy documents is fast, accurate, and hassle-free.
Use customizable templates that you can define to meet your unique business needs and save time on repetitive tasks. You can ensure that all your insurance documents are consistent and precise. Whether you’re managing hundreds of policies or just a few, Openkoda’s Document Generator solution empowers insurers to focus on what matters most – delivering exceptional service to their clients.
Ready to streamline your policy administration? Explore the Openkoda Insurance Platform today and experience the difference in faster application development.
Related Posts
- How to Automate Insurance Policy Renewal Reminders?
- How to Personalize Your Openkoda Interface to Match Your Brand
- How to Create Custom Notifications for Your Application
- How to Manage User Roles and Create Custom Permissions in Your Application
- How to Build a Personalized Insurance Policy Dashboard
